[wpdreams_ajaxsearchlite]
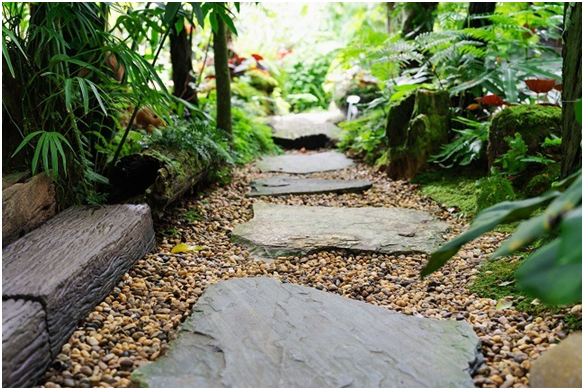
Are you a beaming new homeowner looking for landscape ideas? Perhaps you already have an established flat but want to upgrade it. Sure, you can always contact a landscaping company nearby for help. But there are alternative landscape projects that you can do on your own without expending much. For instance, you can add a gravel path with stepping stones on the patio to your front door or one that will lead to your garden. By doing this, you would not only have an aesthetic home; you will also feel fulfilled, knowing that you did the beautification by yourself.
The close-to-nature beauty of stepping stones is perfect for people who love wilderness and the environment. It’s also a unique and creative way to style your lot surrounding or leading to your house. Looking from afar, it will give your house perspective and base that are pleasing to the eyes. And if we haven’t convinced you enough to have one at your yard, let us tell you that doing this project is very fast, easy, and hassle-free. This is a project that you can definitely do by yourself in just five simple steps and we’ll also be giving bonus tips as you go along.
Recommended Readings:
Why You Should Consider Gravel Paths
Planning Your gravel path with stepping stones
1. Ready that Blueprint – Plan the space where you intend to have your gravel path with stepping stones. You can situate it in front, leading up to the entrance of the house. It is also a bright idea to have the path at the back of your house. Better yet, gravel path can also be used as a guide to your garden. It is also important that you plan the boundaries and width of the path. It should also include the distance of each stepping stone from each other (as a rule of thumb, 10 inches apart should do). Make sure that the stone near your entrance is not very far from it.
Bonus tip: Choose shades of stepping stones and pebbles that are close to the color of your building. Their texture should also be close to thatof the building. But avoid those that are slippery when wet. Dark colors may also be too hot to step on during summers.
LANSONTECH 5 Piece Gardening Tools Set Including Transplanting Spade, Trowel, Cultivator, Pruner and Gardening Gloves, Garden Tools Kit with Heavy Duty Cast-Aluminium Heads & Ergonomic
Here are the steps you need to take to create your gravel
path with stepping stones:
- Clear Up – Weed out the whole area of the path. Make sure that the roots of the weeds are removed to avoid them from growing back. If you want to be sure, spray herbicide on the ground once every three days for six days.
- Next, this is the time to make sure the area is leveled and graded. if the path is not straight/leveled, you can either add soil or play with the existing soil in order to make it smoother.
- When the surface is ready, make sure to place heavy-duty weed resistant fabric (SCOTTS Fabric, 4 by 220-Feet) all over the planned gravel area in order to prevent weeds from coming out through the gravel or stones.
Make sure to fo this:
- Main Course – In this step, you already have to spread evenly
at least 3 inches of the desired gravel/stones. - When you are done with this step you will be ready to place the
stepping stones of your choice. - To make sure they are all on the same line (if that’s what you want), stretch a thread from both ends of the path and use that as a guide
in order to align the stepping stones. - finally when they are all placed nicely, spread some more gravel/stones around each stepping stone until they seem like they are part of the gravel/stones. You should keep in mind that the stepping stones must be a little bit higher than the pebbles. You don’t want your stones to be engulfed by the pebbles.
Jocelyn’s Soil Booster Worm Manure (Castings) 800g – Probiotics for Your Garden
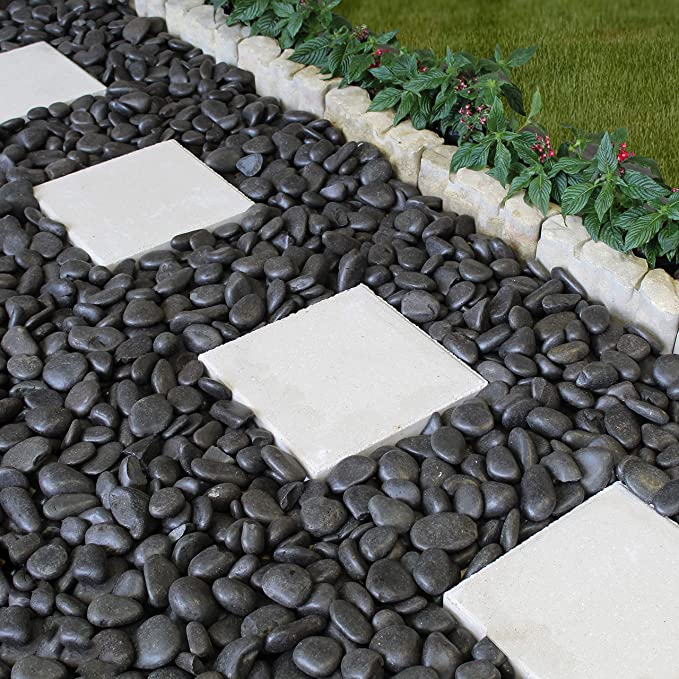
Bonus tip: The color of your pebble and stepping stones must be of close shade, but contrasting to each other.
Bonus tip: Consider putting a strip of black metal in a trench on each side of the gravel path to avoid the pebbles from slipping to the surrounding landscape. Just make sure that the trench is deep enough to avoid tripping. You can also use large stones to border it and upgrade the look.
See? It’s very easy, budget-friendly, and certainly, a DIY that you can do and enjoy! Try these simple, fast, and easy tips on how to add aesthetic value to your home.
My Landscapers has been doing sod installation throughout Toronto, Markham, Vaughan & Richmond Hill. Our professionals best materials and tools to help your lawn look lush, healthy & green. Request your FREE, no-obligation, detailed estimate today, and one of our landscaping experts will contact you.